
Best Nail Art Tools for Beginners (Complete Guide)2026
Have you ever scrolled through Instagram and thought, “I want nails like that!” but had no idea where to start? Nail…
Have you ever scrolled through Instagram and thought, “I want nails like that!” but had no idea where to start? Nail Art Tools you must have You’re not alone. Nail art is one of the biggest beauty trends right now, and the good news is: you can totally do it at home. The secret? Having the right nail art tools.
Without the proper tools, even simple designs can feel frustrating. But once you’ve got the basics in your kit, everything becomes so much easier and a lot more fun. Whether you’re dreaming of floral patterns, French tips, or bold geometric nails, this guide covers everything you need to get started. Let’s dive in!
What Are Nail Art Tools?
Nail art tools are small, specialized items that help you create designs on your nails. Think of them like art supplies but for your fingertips. Just like a painter needs brushes and palettes, a nail artist needs brushes, dotting tools, and other accessories.
For beginners especially, having the right tools makes a huge difference. Without them, you’re basically trying to paint a tiny canvas with a broom. The right nail tools for nail art give you precision, control, and confidence even if you’ve never done nail art before.
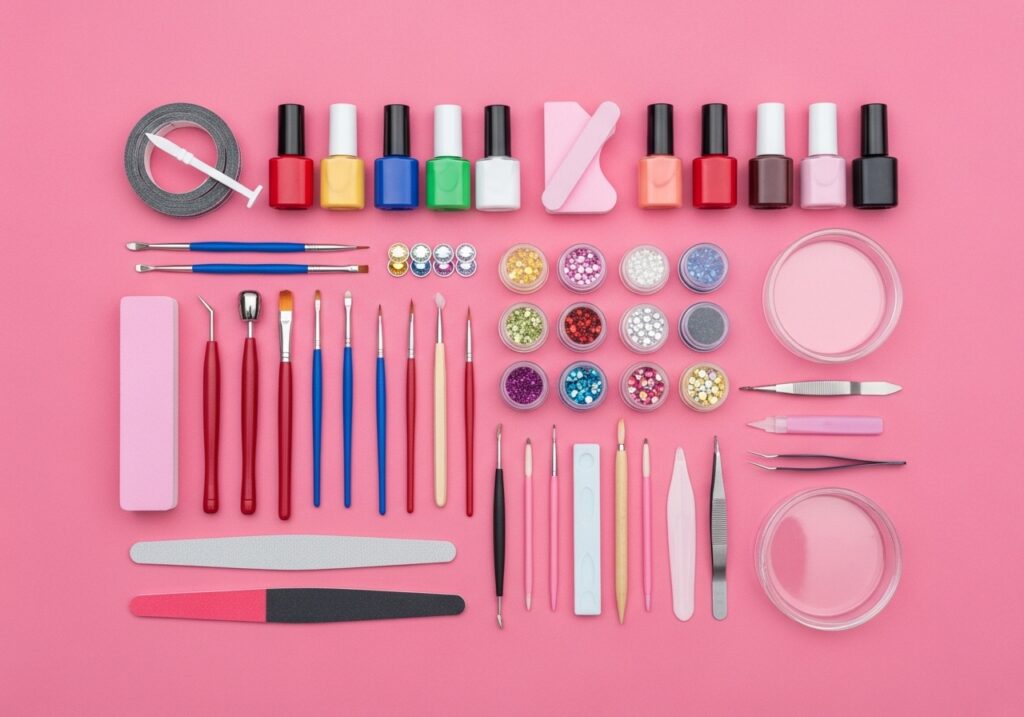
Essential Nail Art Tools List for Beginners
If you’re just starting out, you don’t need to buy everything at once. Here’s a beginner friendly nail art tools list with the must-haves:
- Nail Art Brushes The most important tool. Used for detail lines, swirls, French tips, and more. Different brushes serve different purposes (more on this below).
- Dotting Tools Perfect for creating dots, flowers, and circular patterns. They come in various sizes to give you design flexibility.
- Nail Files & Buffers Shape your nails and smooth the surface before applying any polish. A smooth base = a better finish.
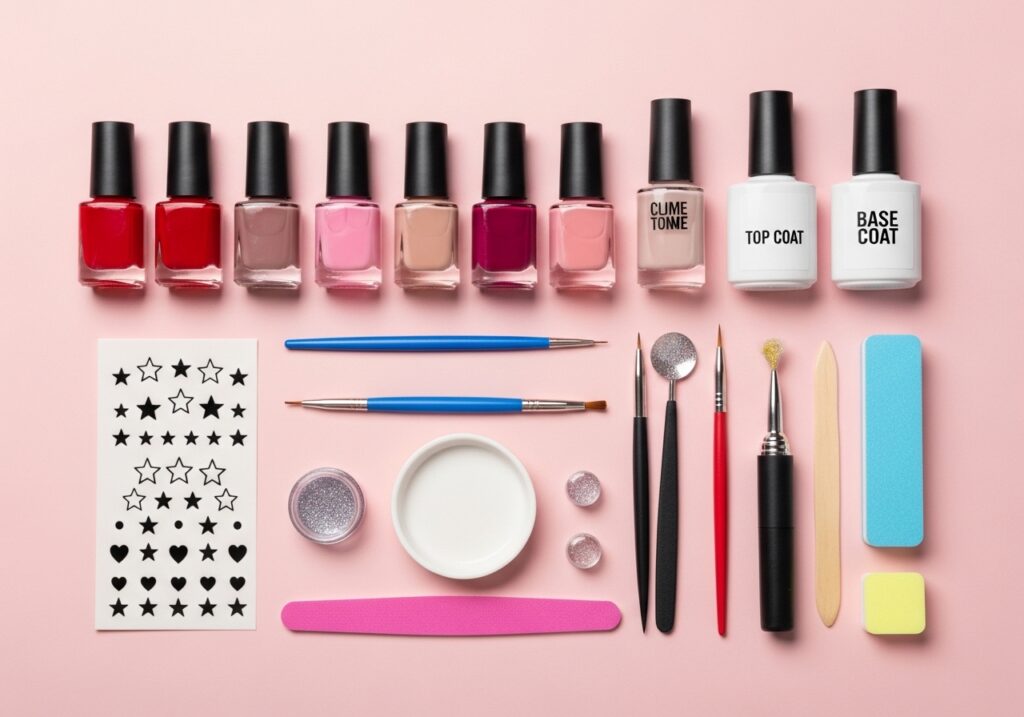
- Nail Polish Your main color! Invest in a few shades you love. Cream finishes are easiest for beginners.
- Base Coat Applied before polish to protect your natural nails and help color last longer.
- Top Coat Applied after your design to seal it in and add a glossy (or matte) finish.
- Nail Cleaner / Acetone For fixing mistakes and cleaning up edges. A small brush dipped in acetone is a lifesaver!
Quick tip: If you’re asking “what tools are needed for nail art?” start with just brushes, a dotting tool, base coat, and top coat. You can build your kit over time!
Best Nail Art Brushes for Beginners
Brushes are the heart of nail art. Knowing which brush does what will save you so much frustration. Here’s a breakdown of the best nail art brushes every beginner should know:
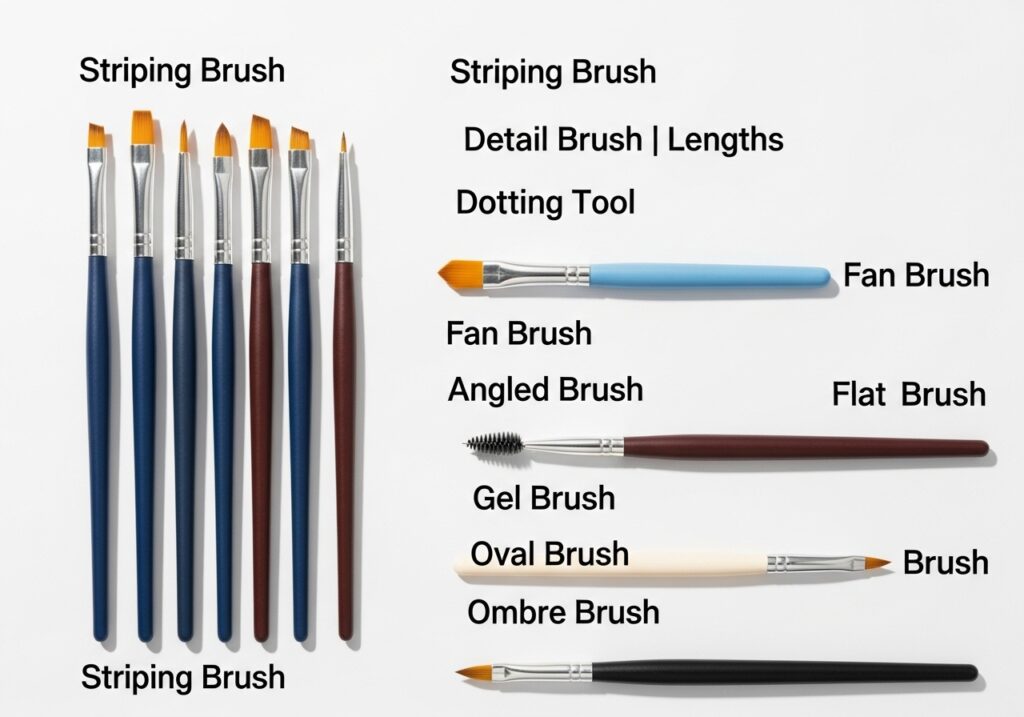
1. Nail Art Liner Brush
This is a long, thin brush perfect for drawing fine lines, swirls, and striping patterns. The nail art liner brush takes a little practice, but it’s incredibly versatile once you get the hang of it. Start slow and use light pressure.
2. Flat Brush
As the name suggests, this brush has a flat, wide tip. Use it to apply color in large areas, create gradient effects, or blend two colors together for an ombre look.
3. Detail / Round Brush
A small, round tipped brush that’s great for painting flowers, petals, and small shapes. This is probably the most beginner-friendly brush of them all.
4. Nail Art Brush for French Tips
If French manicures are your thing, a nail art brush for french tips is a must. It has a flat, curved edge that creates that perfect clean white tip in one stroke. No more wobbly lines!
When shopping, look for professional nail art tools brands that sell brush sets you’ll usually get all four types in one affordable pack.
Advertisement
Nail Art Dotting Tools Guide
Dotting tools are one of the most fun and beginner-friendly items in your kit. They look like a pen with a small metal ball on each end and they’re surprisingly versatile.
Most sets come with nail art dotting tools in multiple sizes:
- Large ball end Makes big dots for polka dot nails or flower centers.
- Medium ball end Great all rounder. Works for petals, spots, and small accents.
- Small ball end Tiny details, teeny-tiny dots, and fine accent work.
Some fun designs you can make with just a dotting tool: polka dot nails, daisies and flowers, heart outlines, snowflakes, and animal prints. Seriously a dotting tool alone can keep you busy for weeks!
Must-Have Nail Art Accessories
Beyond brushes and dotting tools, there are some nail art accessories that can really level up your designs. None of these are essential, but they’re super fun to experiment with.
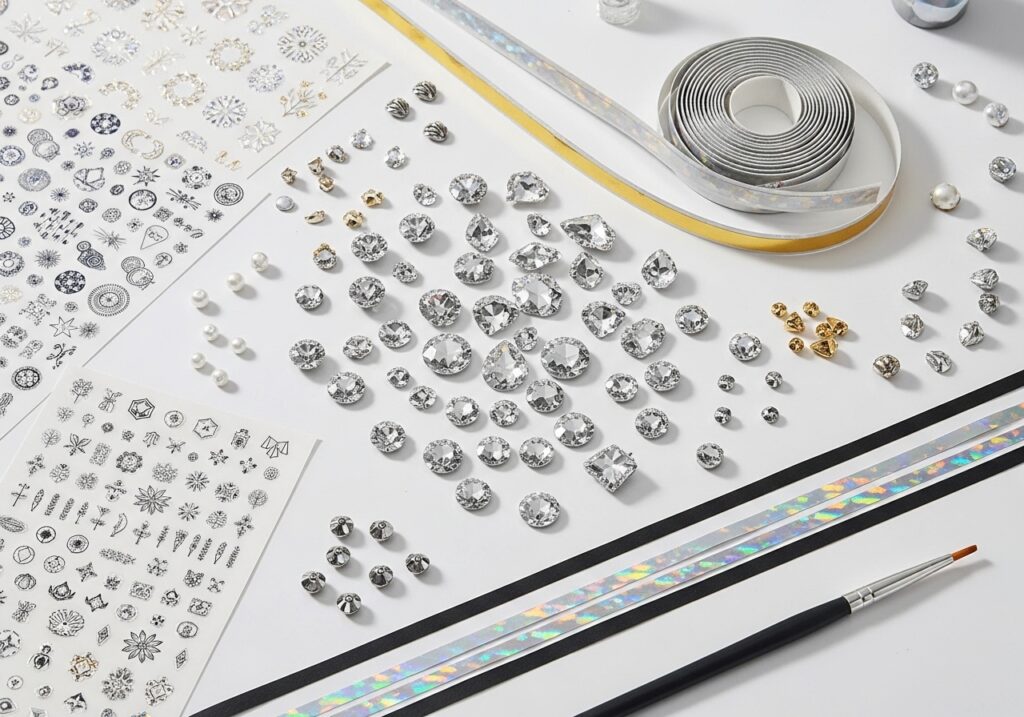
- Rhinestones & Gems Stick them on wet top coat for an instant glam look. No skill required!
- Nail Stickers & Decals Pre-made designs you just peel and apply. Perfect for days when you don’t feel like painting.
- Striping Tape A thin, flexible tape used to create straight lines, geometric shapes, and negative space designs. Peel off before the polish dries fully for a clean edge.
- Stamping Plates Engraved metal plates with patterns. You apply polish, roll it onto a stamper, then stamp the design onto your nail. Gives a professional result even as a beginner.
Nail Art Kits: Are They Worth It?
If you’re just getting started, buying a nail art kit is one of the smartest moves you can make. Instead of hunting for individual items, a kit gives you everything in one go usually at a much lower cost.
A good nail art set for beginners typically includes a variety of brushes, dotting tools, a few glitters, stickers, and sometimes even a UV lamp for gel nails. These nail art supplies for beginners are designed to be user-friendly and budget-conscious.
Who should buy a nail art kit? Anyone who’s just starting out! It removes the guesswork of “which tools do I actually need?” and lets you experiment with everything at once. Once you know what you love, you can invest in higher-quality individual pieces later.
How to Use Nail Art Tools at Home
Wondering how to use nail art tools at home? Follow these simple steps and you’ll be surprised how easy it really is.
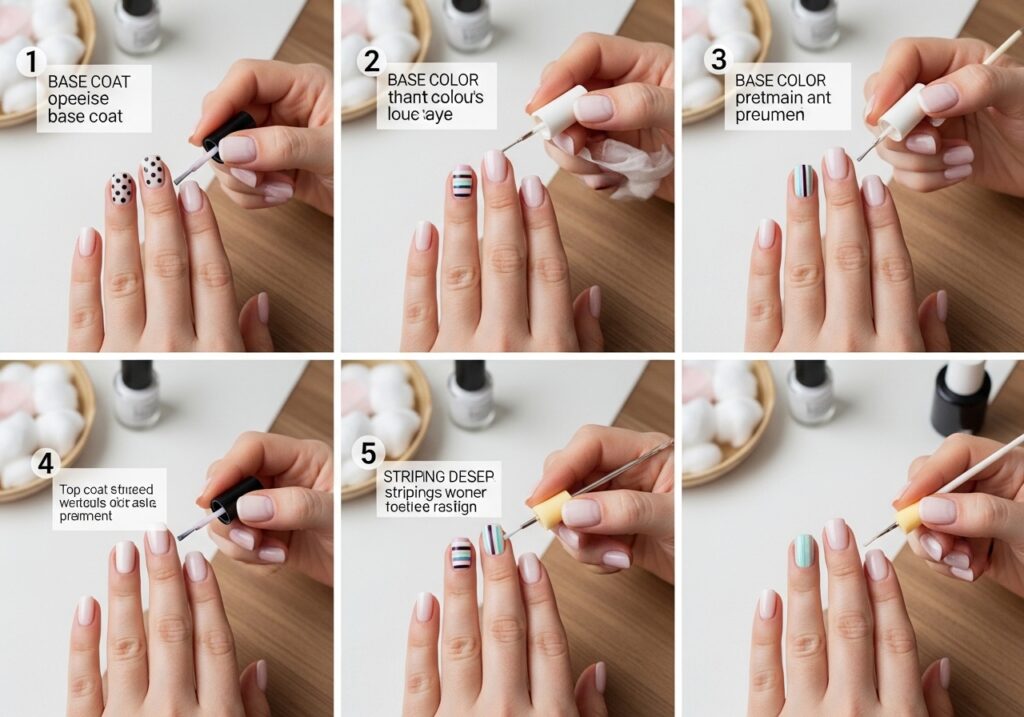
Prep Your Nails
Clean, shape, and buff your nails. Push back cuticles gently. Start with a clean, oil-free surface.
2
Apply Base Coat
Always start with a base coat. It protects your nails and helps the polish stick better. Let it dry fully.
3
Apply Your Base Color
Apply 1–2 thin coats of your chosen nail polish. Thin coats dry faster and last longer.
4
Create Your Design
Now the fun part! Use your brushes, dotting tools, or striping tape to create your design. Work slowly and confidently.
5
Fix Mistakes
Dip a thin brush in acetone to clean up any polish that strayed outside the lines. Do this before the polish fully sets.
6
Seal with Top Coat
Once your design is dry, apply a top coat to lock it in. This adds shine and helps your art last longer.
Pro Tips for Beginners
A few expert tricks that’ll make your nail art journey so much smoother:
01
Practice on a silicone mat first. Get comfortable with your brushes before painting your actual nails.
02
Keep thin coats. Thick polish takes forever to dry and smudges easily. Two thin coats always beat one thick one.
03
Clean your brushes immediately. Don’t let polish dry on your brushes. Clean them with acetone or brush cleaner after every use.
04
Use tape for clean lines. Painter’s tape or nail striping tape gives you crisp, straight edges without wobbling.
05
Patience is everything. Let each layer dry fully before adding the next. Rushing = smudges. Always.
06
Start simple. Master dots and lines before attempting complex florals. Simple designs can look stunning too!
07
Good lighting matters. Always do nail art in a well-lit space. Natural light is ideal. A ring light also works great.
Insert Image Here
Suggested image: “beginner nail art designs dotting tool flowers”
Advertisement
FAQs About Nail Art Tools
What tools are needed for nail art?
The basics are: a base coat, nail polish, a top coat, at least one nail art brush (a liner or detail brush is great to start), and a dotting tool. As you progress, you can add accessories like rhinestones, striping tape, and stamping plates.
What is the best nail art brush for beginners?
A detail brush or a nail art liner brush is ideal for beginners. They’re versatile, easy to control, and work for everything from simple lines to floral designs. Look for brushes with firm but flexible bristles for the best results.
Can I do nail art at home without professional tools?
Yes! You can use toothpicks as dotting tools, bobby pins for polka dots, and a thin brush from any craft store. However, investing in even a basic nail art kit will make a noticeable difference in how clean and detailed your work looks.
How do I clean nail art brushes?
Dip the bristles in acetone or nail brush cleaner and gently wipe on a lint free cloth or tissue. Reshape the bristles and let them air dry flat. Never soak the entire brush handle it loosens the glue that holds the bristles.
Are nail art kits good for beginners?
Absolutely! A starter nail art kit is one of the best investments for beginners. It bundles all the essential nail art supplies for beginners in one affordable set so you don’t have to guess what to buy individually.
Ready to Start Your Nail Art Journey?
Nail art doesn’t have to be intimidating. With the right nail art tools, a little patience, and a lot of creativity, anyone can create beautiful nails at home including you.
Start with the basics: a good brush set, a dotting tool, and quality base and top coats. Once you’ve got those down, the sky’s the limit. Florals, French tips, ombre, geometric it’s all within reach.
Now go grab your tools and paint something beautiful. Your nails are your canvas.

Written by